Using Python Client with Hazelcast
This chapter provides information on how you can use Hazelcast data structures in the Python client, after giving some basic information including an overview to the client API, operation modes of the client and how it handles the failures.
Python Client API Overview
Hazelcast Python client is designed to be fully asynchronous. See the Basic Usage section to learn more about the asynchronous nature of the Python Client.
If you are ready to go, let’s start to use Hazelcast Python client.
The first step is configuration. See the Configuration Overview section for details.
The following is an example on how to configure and initialize the
HazelcastClient to connect to the cluster:
client = hazelcast.HazelcastClient(
    cluster_name="dev",
    cluster_members=[
        "198.51.100.2"
    ]
)
This client object is your gateway to access all the Hazelcast distributed objects.
Let’s create a map and populate it with some data, as shown below.
# Get a Map called 'my-distributed-map'
customer_map = client.get_map("customers").blocking()

# Write and read some data
customer_map.put("1", "John Stiles")
customer_map.put("2", "Richard Miles")
customer_map.put("3", "Judy Doe")
As the final step, if you are done with your client, you can shut it down as shown below. This will release all the used resources and close connections to the cluster.
client.shutdown()
Python Client Operation Modes
The client has two operation modes because of the distributed nature of the data and cluster: smart and unisocket. Refer to the Setting Smart Routing section to see how to configure the client for different operation modes.
Smart Client
In the smart mode, the clients connect to all the cluster members. Since each data partition uses the well known and consistent hashing algorithm, each client can send an operation to the relevant cluster member, which increases the overall throughput and efficiency. Smart mode is the default mode.
Unisocket Client
For some cases, the clients can be required to connect to a single member instead of each member in the cluster. Firewalls, security or some custom networking issues can be the reason for these cases.
In the unisocket client mode, the client will only connect to one of the configured member addresses. This single member will behave as a gateway to the other members. For any operation requested from the client, it will redirect the request to the relevant member and return the response back to the client returned from this member.
Handling Failures
There are two main failure cases you should be aware of. Below sections explain these and the configurations you can perform to achieve proper behavior.
Handling Client Connection Failure
While the client is trying to connect initially to one of the members in
the cluster_members, all the members might not be available.
Instead of giving up, throwing an error and stopping the client, the
client retries to connect as configured. This behavior is described in
the
Configuring Client Connection Retry
section.
The client executes each operation through the already established connection to the cluster. If this connection(s) disconnects or drops, the client will try to reconnect as configured.
Handling Retry-able Operation Failure
While sending the requests to the related members, the operations can
fail due to various reasons. Read-only operations are retried by
default. If you want to enable retrying for the other operations, you
can set the redo_operation to True. See the
Enabling Redo Operation section.
You can set a timeout for retrying the operations sent to a member. This
can be tuned by passing the invocation_timeout argument to the
client. The client will retry an operation within this given period, of
course, if it is a read-only operation or you enabled the
redo_operation as stated in the above. This timeout value is
important when there is a failure resulted by either of the following
causes:
Member throws an exception.
Connection between the client and member is closed.
Client’s heartbeat requests are timed out.
When a connection problem occurs, an operation is retried if it is
certain that it has not run on the member yet or if it is idempotent
such as a read-only operation, i.e., retrying does not have a side
effect. If it is not certain whether the operation has run on the
member, then the non-idempotent operations are not retried. However, as
explained in the first paragraph of this section, you can force all the
client operations to be retried (redo_operation) when there is a
connection failure between the client and member. But in this case, you
should know that some operations may run multiple times causing
conflicts. For example, assume that your client sent a queue.offer
operation to the member and then the connection is lost. Since there
will be no response for this operation, you will not know whether it has
run on the member or not. I f you enabled redo_operation, it means
this operation may run again, which may cause two instances of the same
object in the queue.
When invocation is being retried, the client may wait some time before
it retries again. This duration can be configured using the
invocation_retry_pause argument.
The default retry pause time is 1 second.
Using Distributed Data Structures
Most of the distributed data structures are supported by the Python client. In this chapter, you will learn how to use these distributed data structures.
Using Map
Hazelcast Map is a distributed dictionary. Through the Python client, you can perform operations like reading and writing from/to a Hazelcast Map with the well known get and put methods. For details, see the Map section in the Hazelcast Reference Manual.
A Map usage example is shown below.
# Get a Map called 'my-distributed-map'
my_map = client.get_map("my-distributed-map").blocking()

# Run Put and Get operations
my_map.put("key", "value")
my_map.get("key")

# Run concurrent Map operations (optimistic updates)
my_map.put_if_absent("somekey", "somevalue")
my_map.replace_if_same("key", "value", "newvalue")
Using MultiMap
Hazelcast MultiMap is a distributed and specialized map where you can store multiple values under a single key. For details, see the MultiMap section in the Hazelcast Reference Manual.
A MultiMap usage example is shown below.
# Get a MultiMap called 'my-distributed-multimap'
multi_map = client.get_multi_map("my-distributed-multimap").blocking()

# Put values in the map against the same key
multi_map.put("my-key", "value1")
multi_map.put("my-key", "value2")
multi_map.put("my-key", "value3")

# Read and print out all the values for associated with key called 'my-key'
# Outputs '['value2', 'value1', 'value3']'
values = multi_map.get("my-key")
print(values)

# Remove specific key/value pair
multi_map.remove("my-key", "value2")
Using Replicated Map
Hazelcast Replicated Map is a distributed key-value data structure where the data is replicated to all members in the cluster. It provides full replication of entries to all members for high speed access. For details, see the Replicated Map section in the Hazelcast Reference Manual.
A Replicated Map usage example is shown below.
# Get a ReplicatedMap called 'my-replicated-map'
replicated_map = client.get_replicated_map("my-replicated-map").blocking()

# Put and get a value from the Replicated Map
# (key/value is replicated to all members)
replaced_value = replicated_map.put("key", "value")

# Will be None as its first update
print("replaced value = {}".format(replaced_value)) # Outputs 'replaced value = None'

# The value is retrieved from a random member in the cluster
value = replicated_map.get("key")

print("value for key = {}".format(value)) # Outputs 'value for key = value'
Using Queue
Hazelcast Queue is a distributed queue which enables all cluster members to interact with it. For details, see the Queue section in the Hazelcast Reference Manual.
A Queue usage example is shown below.
# Get a Queue called 'my-distributed-queue'
queue = client.get_queue("my-distributed-queue").blocking()

# Offer a string into the Queue
queue.offer("item")

# Poll the Queue and return the string
item = queue.poll()

# Timed-restricted operations
queue.offer("another-item", 0.5)  # waits up to 0.5 seconds
another_item = queue.poll(5)  # waits up to 5 seconds

# Indefinitely blocking Operations
queue.put("yet-another-item")

print(queue.take()) # Outputs 'yet-another-item'
Using Set
Hazelcast Set is a distributed set which does not allow duplicate elements. For details, see the Set section in the Hazelcast Reference Manual.
A Set usage example is shown below.
# Get a Set called 'my-distributed-set'
my_set = client.get_set("my-distributed-set").blocking()

# Add items to the Set with duplicates
my_set.add("item1")
my_set.add("item1")
my_set.add("item2")
my_set.add("item2")
my_set.add("item2")
my_set.add("item3")

# Get the items. Note that there are no duplicates.
for item in my_set.get_all():
    print(item)
Using List
Hazelcast List is a distributed list which allows duplicate elements and preserves the order of elements. For details, see the List section in the Hazelcast Reference Manual.
A List usage example is shown below.
# Get a List called 'my-distributed-list'
my_list = client.get_list("my-distributed-list").blocking()

# Add element to the list
my_list.add("item1")
my_list.add("item2")

# Remove the first element
print("Removed:", my_list.remove_at(0))  # Outputs 'Removed: item1'

# There is only one element left
print("Current size is", my_list.size())  # Outputs 'Current size is 1'

# Clear the list
my_list.clear()
Using Ringbuffer
Hazelcast Ringbuffer is a replicated but not partitioned data structure that stores its data in a ring-like structure. You can think of it as a circular array with a given capacity. Each Ringbuffer has a tail and a head. The tail is where the items are added and the head is where the items are overwritten or expired. You can reach each element in a Ringbuffer using a sequence ID, which is mapped to the elements between the head and tail (inclusive) of the Ringbuffer. For details, see the Ringbuffer section in the Hazelcast Reference Manual.
A Ringbuffer usage example is shown below.
# Get a RingBuffer called "my-ringbuffer"
ringbuffer = client.get_ringbuffer("my-ringbuffer").blocking()

# Add two items into ring buffer
ringbuffer.add(100)
ringbuffer.add(200)

# We start from the oldest item.
# If you want to start from the next item, call ringbuffer.tail_sequence()+1
sequence = ringbuffer.head_sequence()
print(ringbuffer.read_one(sequence))  # Outputs '100'

sequence += 1
print(ringbuffer.read_one(sequence))  # Outputs '200'
Using ReliableTopic
Hazelcast ReliableTopic is a distributed topic implementation backed up by the Ringbuffer data structure. For details, see the Reliable Topic section in the Hazelcast Reference Manual.
A Reliable Topic usage example is shown below.
# Get a Topic called "my-distributed-topic"
topic = client.get_reliable_topic("my-distributed-topic").blocking()

# Add a Listener to the Topic
topic.add_listener(lambda message: print(message))

# Publish a message to the Topic
topic.publish("Hello to distributed world")
Configuring Reliable Topic
You may configure Reliable Topics using the reliable_topics
argument:
client = hazelcast.HazelcastClient(
    reliable_topics={
        "my-topic": {
            "overload_policy": TopicOverloadPolicy.DISCARD_OLDEST,
            "read_batch_size": 20,
        }
    }
)
The following are the descriptions of configuration elements and attributes:
keys of the dictionary: Name of the Reliable Topic.
overload_policy: Policy to handle an overloaded topic. By default, set toBLOCK.read_batch_size: Number of messages the reliable topic will try to read in batch. It will get at least one, but if there are more available, then it will try to get more to increase throughput. By default, set to10.
Using Topic
Hazelcast Topic is a distribution mechanism for publishing messages that are delivered to multiple subscribers. For details, see the Topic section in the Hazelcast Reference Manual.
A Topic usage example is shown below.
# Function to be called when a message is published
def print_on_message(topic_message):
    print("Got message:", topic_message.message)

# Get a Topic called "my-distributed-topic"
topic = client.get_topic("my-distributed-topic").blocking()

# Add a Listener to the Topic
topic.add_listener(print_on_message)

# Publish a message to the Topic
topic.publish("Hello to distributed world") # Outputs 'Got message: Hello to distributed world'
Using Transactions
Hazelcast Python client provides transactional operations like beginning
transactions, committing transactions and retrieving transactional data
structures like the TransactionalMap, TransactionalSet,
TransactionalList, TransactionalQueue and
TransactionalMultiMap.
You can create a Transaction object using the Python client to
begin, commit and rollback a transaction. You can obtain
transaction-aware instances of queues, maps, sets, lists and multimaps
via the Transaction object, work with them and commit or rollback in
one shot. For details, see the Transactions section
in the Hazelcast Reference Manual.
# Create a Transaction object and begin the transaction
transaction = client.new_transaction(timeout=10)
transaction.begin()

# Get transactional distributed data structures
txn_map = transaction.get_map("transactional-map")
txn_queue = transaction.get_queue("transactional-queue")
txn_set = transaction.get_set("transactional-set")
try:
    obj = txn_queue.poll()

    # Process obj

    txn_map.put("1", "value1")
    txn_set.add("value")

    # Do other things

    # Commit the above changes done in the cluster.
    transaction.commit()
except Exception as ex:
    # In the case of a transactional failure, rollback the transaction
    transaction.rollback()
    print("Transaction failed! {}".format(ex.args))
In a transaction, operations will not be executed immediately. Their
changes will be local to the Transaction object until committed.
However, they will ensure the changes via locks.
For the above example, when txn_map.put() is executed, no data will
be put in the map but the key will be locked against changes. While
committing, operations will be executed, the value will be put to the
map and the key will be unlocked.
The isolation level in Hazelcast Transactions is READ_COMMITTED on
the level of a single partition. If you are in a transaction, you can
read the data in your transaction and the data that is already
committed. If you are not in a transaction, you can only read the
committed data.
One can also use context managers to simplify the usage of the transactional data structures. The example above can be simplified as below.
# Create a Transaction object and begin the transaction
with client.new_transaction(timeout=10) as transaction:
    # Get transactional distributed data structures
    txn_map = transaction.get_map("transactional-map")
    txn_queue = transaction.get_queue("transactional-queue")
    txn_set = transaction.get_set("transactional-set")

    obj = txn_queue.poll()

    # Process obj

    txn_map.put("1", "value1")
    txn_set.add("value")

    # Do other things

    # If everything goes well, the transaction will be
    # committed, if not, it will be rolled back automatically.
Using PN Counter
Hazelcast PNCounter (Positive-Negative Counter) is a CRDT
positive-negative counter implementation. It is an eventually consistent
counter given there is no member failure. For details, see the
PN Counter section
in the Hazelcast Reference Manual.
A PN Counter usage example is shown below.
# Get a PN Counter called 'pn-counter'
pn_counter = client.get_pn_counter("pn-counter").blocking()

# Counter is initialized with 0
print(pn_counter.get()) # 0

# xx_and_get() variants does the operation
# and returns the final value
print(pn_counter.add_and_get(5))  # 5
print(pn_counter.decrement_and_get())  # 4

# get_and_xx() variants returns the current
# value and then does the operation
print(pn_counter.get_and_increment())  # 4
print(pn_counter.get())  # 5
Using Flake ID Generator
Hazelcast FlakeIdGenerator is used to generate cluster-wide unique
identifiers. Generated identifiers are int primitive values and are
k-ordered (roughly ordered). IDs are in the range from 0 to 2^63-1
(maximum signed 64-bit int value). For details, see the FlakeIdGenerator section
in the Hazelcast Reference Manual.
# Get a Flake ID Generator called 'flake-id-generator'
generator = client.get_flake_id_generator("flake-id-generator").blocking()

# Generate a some unique identifier
print("ID:", generator.new_id())
Configuring Flake ID Generator
You may configure Flake ID Generators using the flake_id_generators
argument:
client = hazelcast.HazelcastClient(
    flake_id_generators={
        "flake-id-generator": {
            "prefetch_count": 123,
            "prefetch_validity": 150
        }
    }
)
The following are the descriptions of configuration elements and attributes:
keys of the dictionary: Name of the Flake ID Generator.
prefetch_count: Count of IDs which are pre-fetched on the background when one call togenerator.newId()is made. Its value must be in the range1-100,000. Its default value is100.prefetch_validity: Specifies for how long the pre-fetched IDs can be used. After this time elapses, a new batch of IDs are fetched. Time unit is seconds. Its default value is600seconds (10minutes). The IDs contain a timestamp component, which ensures a rough global ordering of them. If an ID is assigned to an object that was created later, it will be out of order. If ordering is not important, set this value to0.
CP Subsystem
Hazelcast 4.0 introduces CP concurrency primitives with respect to the CAP principle, i.e., they always maintain linearizability and prefer consistency to availability during network partitions and client or server failures.
All data structures within CP Subsystem are available through
client.cp_subsystem component of the client.
Before using Atomic Long, Lock, and Semaphore, CP Subsystem has to be enabled on cluster-side. Refer to CP Subsystem documentation for more information.
Data structures in CP Subsystem run in CP groups. Each CP group elects
its own Raft leader and runs the Raft consensus algorithm independently.
The CP data structures differ from the other Hazelcast data structures
in two aspects. First, an internal commit is performed on the METADATA
CP group every time you fetch a proxy from this interface. Hence,
callers should cache returned proxy objects. Second, if you call
distributed_object.destroy() on a CP data structure proxy, that data
structure is terminated on the underlying CP group and cannot be
reinitialized until the CP group is force-destroyed. For this reason,
please make sure that you are completely done with a CP data structure
before destroying its proxy.
Using AtomicLong
Hazelcast AtomicLong is the distributed implementation of atomic
64-bit integer counter. It offers various atomic operations such as
get, set, get_and_set, compare_and_set and
increment_and_get. This data structure is a part of CP Subsystem.
An Atomic Long usage example is shown below.
# Get an AtomicLong called "my-atomic-long"
atomic_long = client.cp_subsystem.get_atomic_long("my-atomic-long").blocking()
# Get current value
value = atomic_long.get()
print("Value:", value)
# Prints:
# Value: 0

# Increment by 42
atomic_long.add_and_get(42)
# Set to 0 atomically if the current value is 42
result = atomic_long.compare_and_set(42, 0)
print ('CAS operation result:', result)
# Prints:
# CAS operation result: True
AtomicLong implementation does not offer exactly-once / effectively-once execution semantics. It goes with at-least-once execution semantics by default and can cause an API call to be committed multiple times in case of CP member failures. It can be tuned to offer at-most-once execution semantics. Please see fail-on-indeterminate-operation-state server-side setting.
Using Lock
Hazelcast FencedLock is the distributed and reentrant implementation
of a linearizable lock. It is CP with respect to the CAP principle. It
works on top of the Raft consensus algorithm. It offers linearizability
during crash-stop failures and network partitions. If a network
partition occurs, it remains available on at most one side of the
partition.
A basic Lock usage example is shown below.
# Get a FencedLock called "my-lock"
lock = client.cp_subsystem.get_lock("my-lock").blocking()
# Acquire the lock and get the fencing token
fence = lock.lock()
try:
    # Your guarded code goes here
    pass
finally:
    # Make sure to release the lock
    lock.unlock()
FencedLock works on top of CP sessions. It keeps a CP session open while the lock is acquired. Please refer to CP Session documentation for more information.
By default, FencedLock is reentrant. Once a caller acquires the lock, it
can acquire the lock reentrantly as many times as it wants in a
linearizable manner. You can configure the reentrancy behavior on the
member side. For instance, reentrancy can be disabled and FencedLock can
work as a non-reentrant mutex. You can also set a custom reentrancy
limit. When the reentrancy limit is already reached, FencedLock does not
block a lock call. Instead, it fails with
LockAcquireLimitReachedError or a specified return value.
Distributed locks are unfortunately not equivalent to single-node mutexes because of the complexities in distributed systems, such as uncertain communication patterns, and independent and partial failures. In an asynchronous network, no lock service can guarantee mutual exclusion, because there is no way to distinguish between a slow and a crashed process. Consider the following scenario, where a Hazelcast client acquires a FencedLock, then hits a long pause. Since it will not be able to commit session heartbeats while paused, its CP session will be eventually closed. After this moment, another Hazelcast client can acquire this lock. If the first client wakes up again, it may not immediately notice that it has lost ownership of the lock. In this case, multiple clients think they hold the lock. If they attempt to perform an operation on a shared resource, they can break the system. To prevent such situations, you can choose to use an infinite session timeout, but this time probably you are going to deal with liveliness issues. For the scenario above, even if the first client actually crashes, requests sent by 2 clients can be re-ordered in the network and hit the external resource in reverse order.
There is a simple solution for this problem. Lock holders are ordered by a monotonic fencing token, which increments each time the lock is assigned to a new owner. This fencing token can be passed to external services or resources to ensure sequential execution of side effects performed by lock holders.
The following diagram illustrates the idea. Client-1 acquires the lock
first and receives 1 as its fencing token. Then, it passes this
token to the external service, which is our shared resource in this
scenario. Just after that, Client-1 hits a long GC pause and eventually
loses ownership of the lock because it misses to commit CP session
heartbeats. Then, Client-2 chimes in and acquires the lock. Similar to
Client-1, Client-2 passes its fencing token to the external service.
After that, once Client-1 comes back alive, its write request will be
rejected by the external service, and only Client-2 will be able to
safely talk to it.
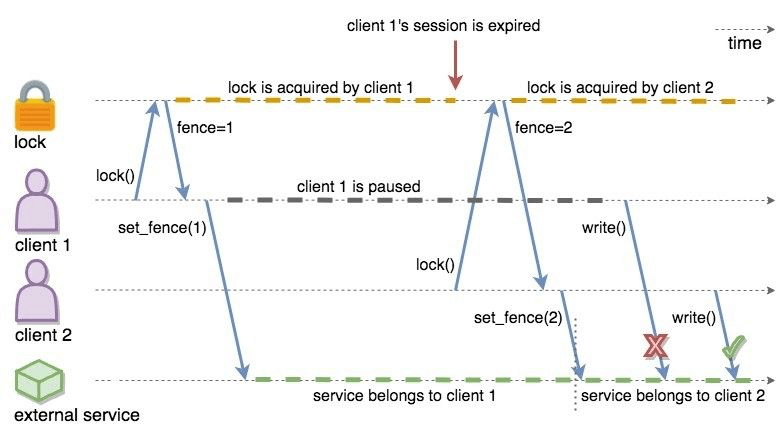
CP Fenced Lock diagram
You can read more about the fencing token idea in Martin Kleppmann’s “How to do distributed locking” blog post and Google’s Chubby paper.
Using Semaphore
Hazelcast Semaphore is the distributed implementation of a
linearizable and distributed semaphore. It offers multiple operations
for acquiring the permits. This data structure is a part of CP
Subsystem.
Semaphore is a cluster-wide counting semaphore. Conceptually, it
maintains a set of permits. Each acquire() waits if necessary until
a permit is available, and then takes it. Dually, each release()
adds a permit, potentially releasing a waiting acquirer. However, no
actual permit objects are used; the semaphore just keeps a count of the
number available and acts accordingly.
A basic Semaphore usage example is shown below.
# Get a Semaphore called "my-semaphore"
semaphore = client.cp_subsystem.get_semaphore("my-semaphore").blocking()
# Try to initialize the semaphore
# (does nothing if the semaphore is already initialized)
semaphore.init(3)
# Acquire 3 permits out of 3
semaphore.acquire(3)
# Release 2 permits
semaphore.release(2)
# Check available permits
available = semaphore.available_permits()
print("Available:", available)
# Prints:
# Available: 2
Beware of the increased risk of indefinite postponement when using the multiple-permit acquire. If permits are released one by one, a caller waiting for one permit will acquire it before a caller waiting for multiple permits regardless of the call order. Correct usage of a semaphore is established by programming convention in the application.
As an alternative, potentially safer approach to the multiple-permit
acquire, you can use the try_acquire() method of Semaphore. It tries
to acquire the permits in optimistic manner and immediately returns with
a bool operation result. It also accepts an optional timeout
argument which specifies the timeout in seconds to acquire the permits
before giving up.
# Try to acquire 2 permits
success = semaphore.try_acquire(2)
# Check for the result of the acquire request
if success:
    try:
        pass
        # Your guarded code goes here
    finally:
        # Make sure to release the permits
        semaphore.release(2)
Semaphore data structure has two variations:
The default implementation is session-aware. In this one, when a caller makes its very first
acquire()call, it starts a new CP session with the underlying CP group. Then, liveliness of the caller is tracked via this CP session. When the caller fails, permits acquired by this caller are automatically and safely released. However, the session-aware version comes with a limitation, that is, a Hazelcast client cannot release permits before acquiring them first. In other words, a client can release only the permits it has acquired earlier.The second implementation is sessionless. This one does not perform auto-cleanup of acquired permits on failures. Acquired permits are not bound to callers and permits can be released without acquiring first. However, you need to handle failed permit owners on your own. If a Hazelcast server or a client fails while holding some permits, they will not be automatically released. You can use the sessionless CP Semaphore implementation by enabling JDK compatibility
jdk-compatibleserver-side setting. Refer to Semaphore configuration documentation for more details.
Using CountDownLatch
Hazelcast CountDownLatch is the distributed implementation of a
linearizable and distributed countdown latch. This data structure is a
cluster-wide synchronization aid that allows one or more callers to wait
until a set of operations being performed in other callers completes.
This data structure is a part of CP Subsystem.
A basic CountDownLatch usage example is shown below.
# Get a CountDownLatch called "my-latch"
latch = client.cp_subsystem.get_count_down_latch("my-latch").blocking()
# Try to initialize the latch
# (does nothing if the count is not zero)
initialized = latch.try_set_count(1)
print("Initialized:", initialized)
# Check count
count = latch.get_count()
print("Count:", count)
# Prints:
# Count: 1

# Bring the count down to zero after 10ms
def run():
    time.sleep(0.01)
    latch.count_down()

t = Thread(target=run)
t.start()

# Wait up to 1 second for the count to become zero up
count_is_zero = latch.await(1)
print("Count is zero:", count_is_zero)
Note
CountDownLatch count can be reset with try_set_count()
after a countdown has finished, but not during an active count.
Using AtomicReference
Hazelcast AtomicReference is the distributed implementation of a
linearizable object reference. It provides a set of atomic operations
allowing to modify the value behind the reference. This data structure
is a part of CP Subsystem.
A basic AtomicReference usage example is shown below.
# Get a AtomicReference called "my-ref"
my_ref = client.cp_subsystem.get_atomic_reference("my-ref").blocking()
# Set the value atomically
my_ref.set(42)
# Read the value
value = my_ref.get()
print("Value:", value)
# Prints:
# Value: 42

# Try to replace the value with "value"
# with a compare-and-set atomic operation
result = my_ref.compare_and_set(42, "value")
print("CAS result:", result)
# Prints:
# CAS result: True
The following are some considerations you need to know when you use AtomicReference:
AtomicReference works based on the byte-content and not on the object-reference. If you use the
compare_and_set()method, do not change to the original value because its serialized content will then be different.All methods returning an object return a private copy. You can modify the private copy, but the rest of the world is shielded from your changes. If you want these changes to be visible to the rest of the world, you need to write the change back to the AtomicReference; but be careful about introducing a data-race.
The in-memory format of an AtomicReference is
binary. The receiving side does not need to have the class definition available unless it needs to be deserialized on the other side, e.g., because a method likealter()is executed. This deserialization is done for every call that needs to have the object instead of the binary content, so be careful with expensive object graphs that need to be deserialized.If you have an object with many fields or an object graph and you only need to calculate some information or need a subset of fields, you can use the
apply()method. With theapply()method, the whole object does not need to be sent over the line; only the information that is relevant is sent.
AtomicReference does not offer exactly-once / effectively-once execution semantics. It goes with at-least-once execution semantics by default and can cause an API call to be committed multiple times in case of CP member failures. It can be tuned to offer at-most-once execution semantics. Please see fail-on-indeterminate-operation-state server-side setting.
Distributed Events
This chapter explains when various events are fired and describes how you can add event listeners on a Hazelcast Python client. These events can be categorized as cluster and distributed data structure events.
Cluster Events
You can add event listeners to a Hazelcast Python client. You can configure the following listeners to listen to the events on the client side:
Membership Listener: Notifies when a member joins to/leaves the cluster.
Lifecycle Listener: Notifies when the client is starting, started, connected, disconnected, shutting down and shutdown.
Listening for Member Events
You can add the following types of member events to the
ClusterService.
member_added: A new member is added to the cluster.member_removed: An existing member leaves the cluster.
The ClusterService class exposes an add_listener() method that
allows one or more functions to be attached to the member events emitted
by the class.
The following is a membership listener registration by using the
add_listener() method.
def added_listener(member):
    print("Member Added: The address is", member.address)


def removed_listener(member):
    print("Member Removed. The address is", member.address)


client.cluster_service.add_listener(
    member_added=added_listener,
    member_removed=removed_listener,
    fire_for_existing=True
)
Also, you can set the fire_for_existing flag to True to receive
the events for list of available members when the listener is
registered.
Membership listeners can also be added during the client startup using
the membership_listeners argument.
client = hazelcast.HazelcastClient(
    membership_listeners=[
        (added_listener, removed_listener)
    ]
)
Listening for Distributed Object Events
The events for distributed objects are invoked when they are created and
destroyed in the cluster. When an event is received, listener function
will be called. The parameter passed into the listener function will be
of the type DistributedObjectEvent. A DistributedObjectEvent
contains the following fields:
name: Name of the distributed object.service_name: Service name of the distributed object.event_type: Type of the invoked event. It is eitherCREATEDorDESTROYED.
The following is example of adding a distributed object listener to a client.
def distributed_object_listener(event):
    print("Distributed object event >>>", event.name, event.service_name, event.event_type)


client.add_distributed_object_listener(
    listener_func=distributed_object_listener
).result()

map_name = "test_map"

# This call causes a CREATED event
test_map = client.get_map(map_name).blocking()

# This causes no event because map was already created
test_map2 = client.get_map(map_name).blocking()

# This causes a DESTROYED event
test_map.destroy()
Output
Distributed object event >>> test_map hz:impl:mapService CREATED
Distributed object event >>> test_map hz:impl:mapService DESTROYED
Listening for Lifecycle Events
The lifecycle listener is notified for the following events:
STARTING: The client is starting.STARTED: The client has started.CONNECTED: The client connected to a member.SHUTTING_DOWN: The client is shutting down.DISCONNECTED: The client disconnected from a member.SHUTDOWN: The client has shutdown.
The following is an example of the lifecycle listener that is added to client during startup and its output.
def lifecycle_listener(state):
    print("Lifecycle Event >>>", state)


client = hazelcast.HazelcastClient(
    lifecycle_listeners=[
        lifecycle_listener
    ]
)
Output:
INFO:hazelcast.lifecycle:HazelcastClient 4.0.0 is STARTING
Lifecycle Event >>> STARTING
INFO:hazelcast.lifecycle:HazelcastClient 4.0.0 is STARTED
Lifecycle Event >>> STARTED
INFO:hazelcast.connection:Trying to connect to Address(host=127.0.0.1, port=5701)
INFO:hazelcast.lifecycle:HazelcastClient 4.0.0 is CONNECTED
Lifecycle Event >>> CONNECTED
INFO:hazelcast.connection:Authenticated with server Address(host=172.17.0.2, port=5701):7682c357-3bec-4841-b330-6f9ae0c08253, server version: 4.0, local address: Address(host=127.0.0.1, port=56732)
INFO:hazelcast.cluster:

Members [1] {
    Member [172.17.0.2]:5701 - 7682c357-3bec-4841-b330-6f9ae0c08253
}

INFO:hazelcast.client:Client started
INFO:hazelcast.lifecycle:HazelcastClient 4.0.0 is SHUTTING_DOWN
Lifecycle Event >>> SHUTTING_DOWN
INFO:hazelcast.connection:Removed connection to Address(host=127.0.0.1, port=5701):7682c357-3bec-4841-b330-6f9ae0c08253, connection: Connection(id=0, live=False, remote_address=Address(host=172.17.0.2, port=5701))
INFO:hazelcast.lifecycle:HazelcastClient 4.0.0 is DISCONNECTED
Lifecycle Event >>> DISCONNECTED
INFO:hazelcast.lifecycle:HazelcastClient 4.0.0 is SHUTDOWN
Lifecycle Event >>> SHUTDOWN
You can also add lifecycle listeners after client initialization using
the LifecycleService.
client.lifecycle_service.add_listener(lifecycle_listener)
Distributed Data Structure Events
You can add event listeners to the distributed data structures.
Listening for Map Events
You can listen to map-wide or entry-based events by attaching functions
to the Map objects using the add_entry_listener() method. You
can listen the following events.
added_func: Function to be called when an entry is added to map.removed_func: Function to be called when an entry is removed from map.updated_func: Function to be called when an entry is updated.evicted_func: Function to be called when an entry is evicted from map.evict_all_func: Function to be called when entries are evicted from map.clear_all_func: Function to be called when entries are cleared from map.merged_func: Function to be called when WAN replicated entry is merged.expired_func: Function to be called when an entry’s live time is expired.
You can also filter the events using key or predicate. There is
also an option called include_value. When this option is set to
true, event will also include the value.
An entry-based event is fired after the operations that affect a
specific entry. For example, map.put(), map.remove() or
map.evict(). An EntryEvent object is passed to the listener
function.
See the following example.
def added(event):
    print("Entry Added: %s-%s" % (event.key, event.value))


customer_map.add_entry_listener(include_value=True, added_func=added)
customer_map.put("4", "Jane Doe")
A map-wide event is fired as a result of a map-wide operation. For
example, map.clear() or map.evict_all(). An EntryEvent
object is passed to the listener function.
See the following example.
def cleared(event):
    print("Map Cleared:", event.number_of_affected_entries)


customer_map.add_entry_listener(include_value=True, clear_all_func=cleared)
customer_map.clear()
Distributed Computing
This chapter explains how you can use Hazelcast entry processor implementation in the Python client.
Using EntryProcessor
Hazelcast supports entry processing. An entry processor is a function that executes your code on a map entry in an atomic way.
An entry processor is a good option if you perform bulk processing on a
Map. Usually you perform a loop of keys – executing
Map.get(key), mutating the value, and finally putting the entry back
in the map using Map.put(key,value). If you perform this process
from a client or from a member where the keys do not exist, you
effectively perform two network hops for each update: the first to
retrieve the data and the second to update the mutated value.
If you are doing the process described above, you should consider using entry processors. An entry processor executes a read and updates upon the member where the data resides. This eliminates the costly network hops described above.
Note
Entry processor is meant to process a single entry per call. Processing multiple entries and data structures in an entry processor is not supported as it may result in deadlocks on the server side.
Hazelcast sends the entry processor to each cluster member and these members apply it to the map entries. Therefore, if you add more members, your processing completes faster.
Processing Entries
The Map class provides the following methods for entry processing:
execute_on_keyprocesses an entry mapped by a key.execute_on_keysprocesses entries mapped by a list of keys.execute_on_entriescan process all entries in a map with a defined predicate. Predicate is optional.
In the Python client, an EntryProcessor should be
IdentifiedDataSerializable or Portable because the server should
be able to deserialize it to process.
The following is an example for EntryProcessor which is an
IdentifiedDataSerializable.
from hazelcast.serialization.api import IdentifiedDataSerializable

class IdentifiedEntryProcessor(IdentifiedDataSerializable):
    def __init__(self, value=None):
        self.value = value

    def read_data(self, object_data_input):
        self.value = object_data_input.read_string()

    def write_data(self, object_data_output):
        object_data_output.write_string(self.value)

    def get_factory_id(self):
        return 5

    def get_class_id(self):
        return 1
Now, you need to make sure that the Hazelcast member recognizes the
entry processor. For this, you need to implement the Java equivalent of
your entry processor and its factory, and create your own compiled class
or JAR files. For adding your own compiled class or JAR files to the
server’s CLASSPATH, see the
Adding User Library to CLASSPATH section.
The following is the Java equivalent of the entry processor in Python client given above:
import com.hazelcast.map.EntryProcessor;
import com.hazelcast.nio.ObjectDataInput;
import com.hazelcast.nio.ObjectDataOutput;
import com.hazelcast.nio.serialization.IdentifiedDataSerializable;

import java.io.IOException;
import java.util.Map;


public class IdentifiedEntryProcessor
        implements EntryProcessor<String, String, String>, IdentifiedDataSerializable {

    static final int CLASS_ID = 1;
    private String value;

    public IdentifiedEntryProcessor() {
    }

    @Override
    public int getFactoryId() {
        return IdentifiedFactory.FACTORY_ID;
    }

    @Override
    public int getClassId() {
        return CLASS_ID;
    }

    @Override
    public void writeData(ObjectDataOutput out) throws IOException {
        out.writeUTF(value);
    }

    @Override
    public void readData(ObjectDataInput in) throws IOException {
        value = in.readUTF();
    }

    @Override
    public String process(Map.Entry<String, String> entry) {
        entry.setValue(value);
        return value;
    }
}
You can implement the above processor’s factory as follows:
import com.hazelcast.nio.serialization.DataSerializableFactory;
import com.hazelcast.nio.serialization.IdentifiedDataSerializable;

public class IdentifiedFactory implements DataSerializableFactory {
    public static final int FACTORY_ID = 5;

    @Override
    public IdentifiedDataSerializable create(int typeId) {
        if (typeId == IdentifiedEntryProcessor.CLASS_ID) {
            return new IdentifiedEntryProcessor();
        }
        return null;
    }
}
Now you need to configure the hazelcast.xml to add your factory as
shown below.
<hazelcast>
    <serialization>
        <data-serializable-factories>
            <data-serializable-factory factory-id="5">
                IdentifiedFactory
            </data-serializable-factory>
        </data-serializable-factories>
    </serialization>
</hazelcast>
The code that runs on the entries is implemented in Java on the server side. The client side entry processor is used to specify which entry processor should be called. For more details about the Java implementation of the entry processor, see the Entry Processor section in the Hazelcast Reference Manual.
After the above implementations and configuration are done and you start
the server where your library is added to its CLASSPATH, you can use
the entry processor in the Map methods. See the following example.
distributed_map = client.get_map("my-distributed-map").blocking()

distributed_map.put("key", "not-processed")
distributed_map.execute_on_key("key", IdentifiedEntryProcessor("processed"))

print(distributed_map.get("key"))  # Outputs 'processed'
SQL
You can use SQL to query data in maps, Kafka topics, or a variety of file systems. Results can be sent directly to the client or inserted into maps or Kafka topics. For streaming queries, you can submit them to a cluster as jobs to run in the background.
Warning
The SQL feature is stabilized in 5.0 versions of the client and the Hazelcast platform. In order for the client and the server to be fully compatible with each other, their major versions must be the same.
Note
In order to use SQL service from the Python client, Jet engine must be
enabled on the members and the hazelcast-sql module must be in the
classpath of the members.
If you are using the CLI, Docker image, or distributions to start Hazelcast members, then you don’t need to do anything, as the above preconditions are already satisfied for such members.
However, if you are using Hazelcast members in the embedded mode, or
receiving errors saying that The Jet engine is disabled or Cannot
execute SQL query because "hazelcast-sql" module is not in the classpath.
while executing queries, enable the Jet engine following one of the
instructions pointed out in the error message, or add the hazelcast-sql
module to your member’s classpath.
Supported Queries
Ad-Hoc Queries
Query large datasets either in one or multiple systems and/or run aggregations on them to get deeper insights.
See the Get Started with SQL Over Maps tutorial for reference.
Streaming Queries
Also known as continuous queries, these keep an open connection to a streaming data source and run a continuous query to get near real-time updates.
See the Get Started with SQL Over Kafka tutorial for reference.
Federated Queries
Query different datasets such as Kafka topics and Hazelcast maps, using a single query. Normally, querying in SQL is database or dataset-specific. However, with mappings, you can pull information from different sources to present a more complete picture.
See the Get Started with SQL Over Files tutorial for reference.
Mappings
To connect to data sources and query them as if they were tables, the SQL service uses a concept called mappings.
Mappings store essential metadata about the source’s data model, data access patterns, and serialization formats so that the SQL service can connect to the data source and query it.
You can create mappings for the following data sources by using the CREATE MAPPING statement:
Querying Map
With SQL you can query the keys and values of maps in your cluster.
Assume that we have a map called employees that contains values of type
Employee:
class Employee(Portable):
    def __init__(self, name=None, age=None):
        self.name = name
        self.age = age

    def write_portable(self, writer):
        writer.write_string("name", self.name)
        writer.write_int("age", self.age)

    def read_portable(self, reader):
        self.name = reader.read_string("name")
        self.age = reader.read_int("age")

    def get_factory_id(self):
        return 1

    def get_class_id(self):
        return 2

employees = client.get_map("employees").blocking()

employees.set(1, Employee("John Doe", 33))
employees.set(2, Employee("Jane Doe", 29))
Before starting to query data, we must create a mapping for the employees
map. The details of CREATE MAPPING statement is discussed in the
reference manual. For
the Employee class above, the mapping statement is shown below. It is
enough to create the mapping once per map.
client.sql.execute(
    """
CREATE MAPPING employees (
    __key INT,
    name VARCHAR,
    age INT
)
TYPE IMap
OPTIONS (
  'keyFormat' = 'int',
  'valueFormat' = 'portable',
  'valuePortableFactoryId' = '1',
  'valuePortableClassId' = '2'
)
    """
).result()
The following code prints names of the employees whose age is less than 30:
result = client.sql.execute("SELECT name FROM employees WHERE age < 30").result()

for row in result:
    name = row["name"]
    print(name)
The following subsections describe how you can access Hazelcast maps and perform queries on them in more details.
Case Sensitivity
Mapping names and field names are case-sensitive.
For example, you can access an employees map as employees but not as
Employees.
Key and Value Objects
A map entry consists of a key and a value. These are accessible through
the __key and this aliases. The following query returns the keys and
values of all entries in the map:
SELECT __key, this FROM employees
“SELECT *” Queries
You may use the SELECT * FROM <table> syntax to get all the table fields.
The __key and this fields are returned by the SELECT * queries if
they do not have nested fields. For the employees map, the following query
does not return the this field, because the value has nested fields
name and age:
-- Returns __key, name, age
SELECT * FROM employee
Key and Value Fields
You may also access the nested fields of a key or a value. The list of exposed fields depends on the serialization format, as described Querying Maps with SQL section.
Using Query Parameters
You can use query parameters to build safer and faster SQL queries.
A query parameter is a piece of information that you supply to a query before you run it. Parameters can be used by themselves or as part of a larger expression to form a criterion in the query.
age_to_compare = 30
client.sql.execute("SELECT * FROM employees WHERE age > ?", age_to_compare).result()
Instead of putting data straight into an SQL statement, you use the ?
placeholder in your client code to indicate that you will replace that
placeholder with a parameter.
Query parameters have the following benefits:
Faster execution of similar queries. If you submit more than one query where only a value changes, the SQL service uses the cached query plan from the first query rather than optimizing each query again.
Protection against SQL injection. If you use query parameters, you don’t need to escape special characters in user-provided strings.
Querying JSON Objects
In Hazelcast, the SQL service supports the following ways of working with JSON data:
json: Maps JSON data to a single column ofJSONtype where you can use JsonPath syntax to query and filter it, including nested levels.json-flat: Maps JSON top-level fields to columns with non-JSON types where you can query only top-level keys.
json
To query json objects, you should create an explicit mapping using the
CREATE MAPPING
statement, similar to the example above.
For example, this code snippet creates a mapping to a new map called
json_employees, which stores the JSON values as HazelcastJsonValue
objects and queries it using nested fields, which is not possible with the
json-flat type:
client.sql.execute(
    """
CREATE OR REPLACE MAPPING json_employees
TYPE IMap
OPTIONS (
    'keyFormat' = 'int',
    'valueFormat' = 'json'
)
    """
).result()

json_employees = client.get_map("json_employees").blocking()

json_employees.set(
    1,
    HazelcastJsonValue(
        {
            "personal": {"name": "John Doe"},
            "job": {"salary": 60000},
        }
    ),
)

json_employees.set(
    2,
    HazelcastJsonValue(
        {
            "personal": {"name": "Jane Doe"},
            "job": {"salary": 80000},
        }
    ),
)

with client.sql.execute(
    """
SELECT JSON_VALUE(this, '$.personal.name') AS name
FROM json_employees
WHERE JSON_VALUE(this, '$.job.salary' RETURNING INT) > ?
    """,
    75000,
).result() as result:
    for row in result:
        print(f"Name: {row['name']}")
The json data type comes with full support for querying JSON in maps and
Kafka topics.
JSON Functions
Hazelcast supports the following functions, which can retrieve JSON data.
JSON_QUERY : Extracts a JSON value from a JSON document or a JSON-formatted string that matches a given JsonPath expression.
JSON_VALUE : Extracts a primitive value, such as a string, number, or boolean that matches a given JsonPath expression. This function returns
NULLif a non-primitive value is matched, unless theON ERRORbehavior is changed.JSON_ARRAY : Returns a JSON array from a list of input data.
JSON_OBJECT : Returns a JSON object from the given key/value pairs.
json-flat
To query json-flat objects, you should create an explicit mapping using the
CREATE MAPPING
statement, similar to the example above.
For example, this code snippet creates a mapping to a new map called
json_flat_employees, which stores the JSON values with columns name
and salary as HazelcastJsonValue objects and queries it using
top-level fields:
client.sql.execute(
    """
CREATE OR REPLACE MAPPING json_flat_employees (
    __key INT,
    name VARCHAR,
    salary INT
)
TYPE IMap
OPTIONS (
    'keyFormat' = 'int',
    'valueFormat' = 'json-flat'
)
    """
).result()

json_flat_employees = client.get_map("json_flat_employees").blocking()

json_flat_employees.set(
    1,
    HazelcastJsonValue(
        {
            "name": "John Doe",
            "salary": 60000,
        }
    ),
)

json_flat_employees.set(
    2,
    HazelcastJsonValue(
        {
            "name": "Jane Doe",
            "salary": 80000,
        }
    ),
)

with client.sql.execute(
        """
SELECT name
FROM json_flat_employees
WHERE salary > ?
        """,
        75000,
).result() as result:
    for row in result:
        print(f"Name: {row['name']}")
Note that, in json-flat type, top-level columns must be explicitly
specified while creating the mapping.
The json-flat format comes with partial support for querying JSON in maps,
Kafka topics, and files.
For more information about working with JSON using SQL see Working with JSON in Hazelcast reference manual.
SQL Statements
Data Manipulation Language(DML) Statements
SELECT: Read data from a table.
SINK INTO/INSERT INTO: Ingest data into a map and/or forward data to other systems.
UPDATE: Overwrite values in map entries.
DELETE: Delete map entries.
Data Definition Language(DDL) Statements
CREATE MAPPING: Map a local or remote data object to a table that Hazelcast can access.
SHOW MAPPINGS: Get the names of existing mappings.
DROP MAPPING: Remove a mapping.
Job Management Statements
CREATE JOB: Create a job that is not tied to the client session.
ALTER JOB: Restart, suspend, or resume a job.
SHOW JOBS: Get the names of all running jobs.
DROP JOB: Cancel a job.
CREATE OR REPLACE SNAPSHOT (Enterprise only): Create a snapshot of a running job, so you can stop and restart it at a later date.
DROP SNAPSHOT (Enterprise only): Cancel a running job.
Data Types
The SQL service supports a set of SQL data types. Every data type is mapped to a Python type that represents the type’s value.
Type Name |
Python Type |
|---|---|
BOOLEAN |
bool |
VARCHAR |
str |
TINYINT |
int |
SMALLINT |
int |
INTEGER |
int |
BIGINT |
int |
DECIMAL |
decimal.Decimal |
REAL |
float |
DOUBLE |
float |
DATE |
datetime.date |
TIME |
datetime.time |
TIMESTAMP |
datetime.datetime |
TIMESTAMP_WITH_TIME_ZONE |
datetime.datetime (with non-None tzinfo) |
OBJECT |
Any Python type |
JSON |
HazelcastJsonValue |
Functions and Operators
Hazelcast supports logical and IS predicates, comparison and mathematical
operators, and aggregate, mathematical, trigonometric, string, table-valued,
and special functions.
See the Reference Manual for details.
Improving the Performance of SQL Queries
You can improve the performance of queries over maps by indexing map entries.
To find out more about indexing map entries, see
add_index() method.
If you find that your queries lead to out of memory exceptions (OOME), consider decreasing the value of the Jet engine’s max-processor-accumulated-records option.
Limitations
SQL has the following limitations. We plan to remove these limitations in future releases.
You cannot run SQL queries on lite members.
The only supported Hazelcast data structure is map. You cannot query other data structures such as replicated maps.
Limited support for joins. See Join Tables.
Distributed Query
Hazelcast partitions your data and spreads it across cluster of members. You can iterate over the map entries and look for certain entries (specified by predicates) you are interested in. However, this is not very efficient because you will have to bring the entire entry set and iterate locally. Instead, Hazelcast allows you to run distributed queries on your distributed map.
How Distributed Query Works
The requested predicate is sent to each member in the cluster.
Each member looks at its own local entries and filters them according to the predicate. At this stage, key-value pairs of the entries are deserialized and then passed to the predicate.
The predicate requester merges all the results coming from each member into a single set.
Distributed query is highly scalable. If you add new members to the cluster, the partition count for each member is reduced and thus the time spent by each member on iterating its entries is reduced. In addition, the pool of partition threads evaluates the entries concurrently in each member, and the network traffic is also reduced since only filtered data is sent to the requester.
Predicate Module Operators
The predicate module offered by the Python client includes many
operators for your query requirements. Some of them are explained below.
equal: Checks if the result of an expression is equal to a given value.not_equal: Checks if the result of an expression is not equal to a given value.instance_of: Checks if the result of an expression has a certain type.like: Checks if the result of an expression matches some string pattern.%(percentage sign) is the placeholder for many characters,_(underscore) is placeholder for only one character.ilike: Checks if the result of an expression matches some string pattern in a case-insensitive manner.greater: Checks if the result of an expression is greater than a certain value.greater_or_equal: Checks if the result of an expression is greater than or equal to a certain value.less: Checks if the result of an expression is less than a certain value.less_or_equal: Checks if the result of an expression is less than or equal to a certain value.between: Checks if the result of an expression is between two values (this is inclusive).in_: Checks if the result of an expression is an element of a certain list.not_: Checks if the result of an expression is false.regex: Checks if the result of an expression matches some regular expression.true: Creates an always true predicate that will pass all items.false: Creates an always false predicate that will filter out all items.
Hazelcast offers the following ways for distributed query purposes:
Combining Predicates with AND, OR, NOT
Distributed SQL Query
Employee Map Query Example
Assume that you have an employee map containing the instances of
Employee class, as coded below.
from hazelcast.serialization.api import Portable

class Employee(Portable):
    def __init__(self, name=None, age=None, active=None, salary=None):
        self.name = name
        self.age = age
        self.active = active
        self.salary = salary

    def get_class_id(self):
        return 100

    def get_factory_id(self):
        return 1000

    def read_portable(self, reader):
        self.name = reader.read_string("name")
        self.age = reader.read_int("age")
        self.active = reader.read_boolean("active")
        self.salary = reader.read_double("salary")

    def write_portable(self, writer):
        writer.write_string("name", self.name)
        writer.write_int("age", self.age)
        writer.write_boolean("active", self.active)
        writer.write_double("salary", self.salary)
Note that Employee extends Portable. As portable types are not
deserialized on the server side for querying, you don’t need to
implement its Java equivalent on the server side.
For types that are not portable, you need to implement its Java
equivalent and its data serializable factory on the server side for
server to reconstitute the objects from binary formats. In this case,
you need to compile the Employee and related factory classes with
server’s CLASSPATH and add them to the user-lib directory in the
extracted hazelcast-<version>.zip (or tar) before starting the
server. See the Adding User Library to CLASSPATH
section.
Note
Querying with Portable class is faster as compared to
IdentifiedDataSerializable.
Querying by Combining Predicates with AND, OR, NOT
You can combine predicates by using the and_, or_ and not_
operators, as shown in the below example.
from hazelcast.predicate import and_, equal, less

employee_map = client.get_map("employee")

predicate = and_(equal('active', True), less('age', 30))

employees = employee_map.values(predicate).result()
In the above example code, predicate verifies whether the entry is
active and its age value is less than 30. This predicate is
applied to the employee map using the Map.values method. This
method sends the predicate to all cluster members and merges the results
coming from them.
Note
Predicates can also be applied to key_set and
entry_set of a map.
Querying with SQL
SqlPredicate takes the regular SQL where clause. See the
following example:
from hazelcast.predicate import sql

employee_map = client.get_map("employee")

employees = employee_map.values(sql("active AND age < 30")).result()
Supported SQL Syntax
AND/OR: <expression> AND <expression> AND <expression>…
active AND age > 30active = false OR age = 45 OR name = 'Joe'active AND ( age > 20 OR salary < 60000 )
Equality: =, !=, <, ⇐, >, >=
<expression> = valueage <= 30name = 'Joe'salary != 50000
BETWEEN: <attribute> [NOT] BETWEEN <value1> AND <value2>
age BETWEEN 20 AND 33 ( same as age >= 20 AND age ⇐ 33 )age NOT BETWEEN 30 AND 40 ( same as age < 30 OR age > 40 )
IN: <attribute> [NOT] IN (val1, val2,…)
age IN ( 20, 30, 40 )age NOT IN ( 60, 70 )active AND ( salary >= 50000 OR ( age NOT BETWEEN 20 AND 30 ) )age IN ( 20, 30, 40 ) AND salary BETWEEN ( 50000, 80000 )
LIKE: <attribute> [NOT] LIKE 'expression'
The % (percentage sign) is the placeholder for multiple characters,
an _ (underscore) is the placeholder for only one character.
name LIKE 'Jo%'(true for ‘Joe’, ‘Josh’, ‘Joseph’ etc.)name LIKE 'Jo_'(true for ‘Joe’; false for ‘Josh’)name NOT LIKE 'Jo_'(true for ‘Josh’; false for ‘Joe’)name LIKE 'J_s%'(true for ‘Josh’, ‘Joseph’; false ‘John’, ‘Joe’)
ILIKE: <attribute> [NOT] ILIKE 'expression'
ILIKE is similar to the LIKE predicate but in a case-insensitive manner.
name ILIKE 'Jo%'(true for ‘Joe’, ‘joe’, ‘jOe’,‘Josh’,‘joSH’, etc.)name ILIKE 'Jo_'(true for ‘Joe’ or ‘jOE’; false for ‘Josh’)
REGEX: <attribute> [NOT] REGEX 'expression'
name REGEX 'abc-.*'(true for ‘abc-123’; false for ‘abx-123’)
Querying Examples with Predicates
You can use the __key attribute to perform a predicated search for
the entry keys. See the following example:
from hazelcast.predicate import sql

person_map = client.get_map("persons").blocking()

person_map.put("John", 28)
person_map.put("Mary", 23)
person_map.put("Judy", 30)

predicate = sql("__key like M%")

persons = person_map.values(predicate)

print(persons[0]) # Outputs '23'
In this example, the code creates a list with the values whose keys start with the letter “M”.
You can use the this attribute to perform a predicated search for
the entry values. See the following example:
from hazelcast.predicate import greater_or_equal

person_map = client.get_map("persons").blocking()

person_map.put("John", 28)
person_map.put("Mary", 23)
person_map.put("Judy", 30)

predicate = greater_or_equal("this", 27)

persons = person_map.values(predicate)

print(persons[0], persons[1]) # Outputs '28 30'
In this example, the code creates a list with the values greater than or equal to “27”.
Querying with JSON Strings
You can query JSON strings stored inside your Hazelcast clusters. To
query the JSON string, you first need to create a HazelcastJsonValue
from the JSON string or JSON serializable object. You can use
HazelcastJsonValues both as keys and values in the distributed
data structures. Then, it is possible to query these objects using the
Hazelcast query methods explained in this section.
person1 = "{ \"name\": \"John\", \"age\": 35 }"
person2 = "{ \"name\": \"Jane\", \"age\": 24 }"
person3 = {"name": "Trey", "age": 17}

id_person_map = client.get_map("json-values").blocking()

# From JSON string
id_person_map.put(1, HazelcastJsonValue(person1))
id_person_map.put(2, HazelcastJsonValue(person2))

# From JSON serializable object
id_person_map.put(3, HazelcastJsonValue(person3))

people_under_21 = id_person_map.values(less("age", 21))
When running the queries, Hazelcast treats values extracted from the
JSON documents as Java types so they can be compared with the query
attribute. JSON specification defines five primitive types to be used in
the JSON documents: number,string, true, false and
null. The string, true/false and null types are treated
as String, boolean and null, respectively. We treat the
extracted number values as longs if they can be represented by
a long. Otherwise, numbers are treated as doubles.
It is possible to query nested attributes and arrays in the JSON
documents. The query syntax is the same as querying other Hazelcast
objects using the Predicates.
# Sample JSON object
# {
#     "departmentId": 1,
#     "room": "alpha",
#     "people": [
#         {
#             "name": "Peter",
#             "age": 26,
#             "salary": 50000
#         },
#         {
#             "name": "Jonah",
#             "age": 50,
#             "salary": 140000
#         }
#     ]
# }
# The following query finds all the departments that have a person named "Peter" working in them.

department_with_peter = departments.values(equal("people[any].name", "Peter"))
HazelcastJsonValue is a lightweight wrapper around your JSON
strings. It is used merely as a way to indicate that the contained
string should be treated as a valid JSON value. Hazelcast does not check
the validity of JSON strings put into to the maps. Putting an invalid
JSON string into a map is permissible. However, in that case whether
such an entry is going to be returned or not from a query is not
defined.
Metadata Creation for JSON Querying
Hazelcast stores a metadata object per JSON serialized object stored.
This metadata object is created every time a JSON serialized object is
put into an Map. Metadata is later used to speed up the query
operations. Metadata creation is on by default. Depending on your
application’s needs, you may want to turn off the metadata creation to
decrease the put latency and increase the throughput.
You can configure this using metadata-policy element for the map
configuration on the member side as follows:
<hazelcast>
    ...
    <map name="map-a">
        <!--
        valid values for metadata-policy are:
          - OFF
          - CREATE_ON_UPDATE (default)
        -->
        <metadata-policy>OFF</metadata-policy>
    </map>
    ...
</hazelcast>
Filtering with Paging Predicates
Hazelcast Python client provides paging for defined predicates. With its
PagingPredicate, you can get a collection of keys, values, or
entries page by page by filtering them with predicates and giving the
size of the pages. Also, you can sort the entries by specifying
comparators. In this case, the comparator should be either Portable
or IdentifiedDataSerializable and the serialization factory
implementations should be registered on the member side. Please note
that, paging is done on the cluster members. Hence, client only sends a
marker comparator to indicate members which comparator to use. The
comparision logic must be defined on the member side by implementing the
java.util.Comparator<Map.Entry> interface.
Paging predicates require the objects to be deserialized on the member side from which the collection is retrieved. Therefore, you need to register the serialization factories you use on all the members on which the paging predicates are used. See the Adding User Library to CLASSPATH section for more details.
In the example code below:
The
greater_or_equalpredicate gets values from thestudentsmap. This predicate has a filter to retrieve the objects with anagegreater than or equal to18.Then a
PagingPredicateis constructed in which the page size is5, so that there are five objects in each page. The first time thevalues()method is called, the first page is fetched.Finally, the subsequent page is fetched by calling the
next_page()method ofPagingPredicateand querying the map again with the updatedPagingPredicate.
from hazelcast.predicate import paging, greater_or_equal

...

m = client.get_map("students").blocking()
predicate = paging(greater_or_equal("age", 18), 5)

# Retrieve the first page
values = m.values(predicate)

...

# Set up next page
predicate.next_page()

# Retrieve next page
values = m.values(predicate)
If a comparator is not specified for PagingPredicate, but you want
to get a collection of keys or values page by page, keys or values must
implement the java.lang.Comparable interface on the member side.
Otherwise, paging fails with an exception from the server. Luckily, a lot
of types implement the Comparable interface by
default,
including the primitive types, so, you may use values of types int,
float, str etc. in paging without specifying a comparator on the
Python client.
You can also access a specific page more easily by setting the
predicate.page attribute before making the remote call. This way, if
you make a query for the hundredth page, for example, it gets all
100 pages at once instead of reaching the hundredth page one by one
using the next_page() method.
Note
PagingPredicate, also known as Order & Limit, is not supported in
Transactional Context.
Aggregations
Aggregations allow computing a value of some function (e.g sum or max)
over the stored map entries. The computation is performed in a fully
distributed manner, so no data other than the computed function value is
transferred to the client, making the computation fast.
The aggregator module provides a wide variety of built-in aggregators. The
full list is presented below:
countdistinctdouble_avgdouble_sumfixed_point_sumfloating_point_sumint_avgint_sumlong_avglong_summax_min_number_avgmax_bymax_by
These aggregators are used with the map.aggregate function, which takes an
optional predicate argument.
See the following example.
import hazelcast

from hazelcast.aggregator import count, number_avg
from hazelcast.predicate import greater_or_equal

client = hazelcast.HazelcastClient()
employees = client.get_map("employees").blocking()

employees.put("John Stiles", 23)
employees.put("Judy Doe", 29)
employees.put("Richard Miles", 38)

employee_count = employees.aggregate(count())
# Prints:
# There are 3 employees
print("There are %d employees" % employee_count)

# Run count with predicate
employee_count = employees.aggregate(count(), greater_or_equal("this", 25))
# Prints:
# There are 2 employees older than 24
print("There are %d employees older than 24" % employee_count)

# Run average aggregate
average_age = employees.aggregate(number_avg())
# Prints:
# Average age is 30
print("Average age is %f" % average_age)
Projections
There are cases where instead of sending all the data returned by a query from the server, you want to transform (strip down) each result object in order to avoid redundant network traffic.
For example, you select all employees based on some criteria, but you just want to return their name instead of the whole object. It is easily doable with the Projections.
The projection module provides three projection functions:
single_attribute: Extracts a single attribute from an object and returns it.multi_attribute: Extracts multiple attributes from an object and returns them as alist.identity: Returns the object as it is.
These projections are used with the map.project function, which takes an
optional predicate argument.
See the following example.
import hazelcast

from hazelcast.core import HazelcastJsonValue
from hazelcast.predicate import greater
from hazelcast.projection import single_attribute, multi_attribute

client = hazelcast.HazelcastClient()
employees = client.get_map("employees").blocking()

employees.put(1, HazelcastJsonValue({"age": 25, "height": 180, "weight": 60}))
employees.put(2, HazelcastJsonValue({"age": 21, "height": 170, "weight": 70}))
employees.put(3, HazelcastJsonValue({"age": 40, "height": 175, "weight": 75}))

ages = employees.project(single_attribute("age"))

# Prints: "Ages of the employees are [21, 25, 40]"
print("Ages of the employees are %s" % ages)

filtered_ages = employees.project(single_attribute("age"), greater("age", 23))

# Prints: "Ages of the filtered employees are [25, 40]"
print("Ages of the filtered employees are %s" % filtered_ages)

attributes = employees.project(multi_attribute("age", "height"))

# Prints: "Ages and heights of the employees are [[21, 170], [25, 180], [40, 175]]"
print("Ages and heights of the employees are %s" % attributes)
Performance
Near Cache
Map entries in Hazelcast are partitioned across the cluster members.
Hazelcast clients do not have local data at all. Suppose you read the
key k a number of times from a Hazelcast client and k is owned
by a member in your cluster. Then each map.get(k) will be a remote
operation, which creates a lot of network trips. If you have a map that
is mostly read, then you should consider creating a local Near Cache, so
that reads are sped up and less network traffic is created.
These benefits do not come for free, please consider the following trade-offs:
Clients with a Near Cache will have to hold the extra cached data, which increases their memory consumption.
If invalidation is enabled and entries are updated frequently, then invalidations will be costly.
Near Cache breaks the strong consistency guarantees; you might be reading stale data.
Near Cache is highly recommended for maps that are mostly read.
Configuring Near Cache
The following snippet show how a Near Cache is configured in the Python
client using the near_caches argument, presenting all available
values for each element. When an element is missing from the
configuration, its default value is used.
from hazelcast.config import InMemoryFormat, EvictionPolicy

client = hazelcast.HazelcastClient(
    near_caches={
        "mostly-read-map": {
            "invalidate_on_change": True,
            "time_to_live": 60,
            "max_idle": 30,
            # You can also set these to "OBJECT"
            # and "LRU" without importing anything.
            "in_memory_format": InMemoryFormat.OBJECT,
            "eviction_policy": EvictionPolicy.LRU,
            "eviction_max_size": 100,
            "eviction_sampling_count": 8,
            "eviction_sampling_pool_size": 16
        }
    }
)
Following are the descriptions of all configuration elements:
in_memory_format: Specifies in which format data will be stored in your Near Cache. Note that a map’s in-memory format can be different from that of its Near Cache. Available values are as follows:BINARY: Data will be stored in serialized binary format (default value).OBJECT: Data will be stored in deserialized format.
invalidate_on_change: Specifies whether the cached entries are evicted when the entries are updated or removed. Its default value isTrue.time_to_live: Maximum number of seconds for each entry to stay in the Near Cache. Entries that are older than this period are automatically evicted from the Near Cache. Regardless of the eviction policy used,time_to_live_secondsstill applies. Any non-negative number can be assigned. Its default value isNone.Nonemeans infinite.max_idle: Maximum number of seconds each entry can stay in the Near Cache as untouched (not read). Entries that are not read more than this period are removed from the Near Cache. Any non-negative number can be assigned. Its default value isNone.Nonemeans infinite.eviction_policy: Eviction policy configuration. Available values are as follows:LRU: Least Recently Used (default value).LFU: Least Frequently Used.NONE: No items are evicted and theeviction_max_sizeproperty is ignored. You still can combine it withtime_to_liveandmax_idleto evict items from the Near Cache.RANDOM: A random item is evicted.
eviction_max_size: Maximum number of entries kept in the memory before eviction kicks in.eviction_sampling_count: Number of random entries that are evaluated to see if some of them are already expired. If there are expired entries, those are removed and there is no need for eviction.eviction_sampling_pool_size: Size of the pool for eviction candidates. The pool is kept sorted according to eviction policy. The entry with the highest score is evicted.
Near Cache Example for Map
The following is an example configuration for a Near Cache defined in
the mostly-read-map map. According to this configuration, the
entries are stored as OBJECT’s in this Near Cache and eviction
starts when the count of entries reaches 5000; entries are evicted
based on the LRU (Least Recently Used) policy. In addition, when an
entry is updated or removed on the member side, it is eventually evicted
on the client side.
client = hazelcast.HazelcastClient(
    near_caches={
        "mostly-read-map": {
            "invalidate_on_change": True,
            "in_memory_format": InMemoryFormat.OBJECT,
            "eviction_policy": EvictionPolicy.LRU,
            "eviction_max_size": 5000,
        }
    }
)
Near Cache Eviction
In the scope of Near Cache, eviction means evicting (clearing) the
entries selected according to the given eviction_policy when the
specified eviction_max_size has been reached.
The eviction_max_size defines the entry count when the Near Cache is
full and determines whether the eviction should be triggered.
Once the eviction is triggered, the configured eviction_policy
determines which, if any, entries must be evicted.
Near Cache Expiration
Expiration means the eviction of expired records. A record is expired:
If it is not touched (accessed/read) for
max_idlesecondstime_to_liveseconds passed since it is put to Near Cache
The actual expiration is performed when a record is accessed: it is
checked if the record is expired or not. If it is expired, it is evicted
and KeyError is raised to the caller.
Near Cache Invalidation
Invalidation is the process of removing an entry from the Near Cache when its value is updated or it is removed from the original map (to prevent stale reads). See the Near Cache Invalidation section in the Hazelcast Reference Manual.
Monitoring and Logging
Enabling Client Statistics
You can monitor your clients using Hazelcast Management Center.
As a prerequisite, you need to enable the client statistics before
starting your clients. There are two arguments of HazelcastClient
related to client statistics:
statistics_enabled: If set toTrue, it enables collecting the client statistics and sending them to the cluster. When it isTrueyou can monitor the clients that are connected to your Hazelcast cluster, using Hazelcast Management Center. Its default value isFalse.statistics_period: Period in seconds the client statistics are collected and sent to the cluster. Its default value is3.
You can enable client statistics and set a non-default period in seconds as follows:
client = hazelcast.HazelcastClient(
    statistics_enabled=True,
    statistics_period=4
)
Hazelcast Python client can collect statistics related to the client and Near Caches without an extra dependency. However, to get the statistics about the runtime and operating system, psutil is used as an extra dependency.
If the psutil is installed, runtime and operating system statistics
will be sent to cluster along with statistics related to the client and
Near Caches. If not, only the client and Near Cache statistics will be
sent.
psutil can be installed independently or with the Hazelcast Python
client as follows:
From PyPI
pip install hazelcast-python-client[stats]
From source
pip install -e .[stats]
After enabling the client statistics, you can monitor your clients using Hazelcast Management Center. Please refer to the Monitoring Clients section in the Hazelcast Management Center Reference Manual for more information on the client statistics.
Logging Configuration
Hazelcast Python client uses Python’s builtin logging package to
perform logging.
All the loggers used throughout the client are identified by their
module names. Hence, one may configure the hazelcast parent logger
and use the same configuration for the child loggers such as
hazelcast.lifecycle without an extra effort.
Below is an example of the logging configuration with INFO log level
and a StreamHandler with a custom format, and its output.
import logging
import hazelcast

logger = logging.getLogger("hazelcast")
logger.setLevel(logging.INFO)

handler = logging.StreamHandler()
formatter = logging.Formatter("%(asctime)s - %(name)s - %(levelname)s - %(message)s")
handler.setFormatter(formatter)
logger.addHandler(handler)

client = hazelcast.HazelcastClient()

client.shutdown()
Output
2020-10-16 13:31:35,605 - hazelcast.lifecycle - INFO - HazelcastClient 4.0.0 is STARTING
2020-10-16 13:31:35,605 - hazelcast.lifecycle - INFO - HazelcastClient 4.0.0 is STARTED
2020-10-16 13:31:35,605 - hazelcast.connection - INFO - Trying to connect to Address(host=127.0.0.1, port=5701)
2020-10-16 13:31:35,622 - hazelcast.lifecycle - INFO - HazelcastClient 4.0.0 is CONNECTED
2020-10-16 13:31:35,622 - hazelcast.connection - INFO - Authenticated with server Address(host=172.17.0.2, port=5701):7682c357-3bec-4841-b330-6f9ae0c08253, server version: 4.0, local address: Address(host=127.0.0.1, port=56752)
2020-10-16 13:31:35,623 - hazelcast.cluster - INFO -

Members [1] {
    Member [172.17.0.2]:5701 - 7682c357-3bec-4841-b330-6f9ae0c08253
}

2020-10-16 13:31:35,624 - hazelcast.client - INFO - Client started
2020-10-16 13:31:35,624 - hazelcast.lifecycle - INFO - HazelcastClient 4.0.0 is SHUTTING_DOWN
2020-10-16 13:31:35,624 - hazelcast.connection - INFO - Removed connection to Address(host=127.0.0.1, port=5701):7682c357-3bec-4841-b330-6f9ae0c08253, connection: Connection(id=0, live=False, remote_address=Address(host=172.17.0.2, port=5701))
2020-10-16 13:31:35,624 - hazelcast.lifecycle - INFO - HazelcastClient 4.0.0 is DISCONNECTED
2020-10-16 13:31:35,634 - hazelcast.lifecycle - INFO - HazelcastClient 4.0.0 is SHUTDOWN
A handy alternative to above example would be configuring the root
logger using the logging.basicConfig() utility method. Beware that,
every logger is the child of the root logger in Python. Hence,
configuring the root logger may have application level impact.
Nonetheless, it is useful for the testing or development purposes.
import logging
import hazelcast

logging.basicConfig(level=logging.INFO)

client = hazelcast.HazelcastClient()

client.shutdown()
Output
INFO:hazelcast.lifecycle:HazelcastClient 4.0.0 is STARTING
INFO:hazelcast.lifecycle:HazelcastClient 4.0.0 is STARTED
INFO:hazelcast.connection:Trying to connect to Address(host=127.0.0.1, port=5701)
INFO:hazelcast.lifecycle:HazelcastClient 4.0.0 is CONNECTED
INFO:hazelcast.connection:Authenticated with server Address(host=172.17.0.2, port=5701):7682c357-3bec-4841-b330-6f9ae0c08253, server version: 4.0, local address: Address(host=127.0.0.1, port=56758)
INFO:hazelcast.cluster:

Members [1] {
    Member [172.17.0.2]:5701 - 7682c357-3bec-4841-b330-6f9ae0c08253
}

INFO:hazelcast.client:Client started
INFO:hazelcast.lifecycle:HazelcastClient 4.0.0 is SHUTTING_DOWN
INFO:hazelcast.connection:Removed connection to Address(host=127.0.0.1, port=5701):7682c357-3bec-4841-b330-6f9ae0c08253, connection: Connection(id=0, live=False, remote_address=Address(host=172.17.0.2, port=5701))
INFO:hazelcast.lifecycle:HazelcastClient 4.0.0 is DISCONNECTED
INFO:hazelcast.lifecycle:HazelcastClient 4.0.0 is SHUTDOWN
To learn more about the logging package and its capabilities, please
see the logging
cookbook and
documentation of
the logging package.
Defining Client Labels
Through the client labels, you can assign special roles for your clients and use these roles to perform some actions specific to those client connections.
You can also group your clients using the client labels. These client groups can be blacklisted in Hazelcast Management Center so that they can be prevented from connecting to a cluster. See the related section in the Hazelcast Management Center Reference Manual for more information on this topic.
You can define the client labels using the labels config option. See
the below example.
client = hazelcast.HazelcastClient(
    labels=[
        "role admin",
        "region foo"
    ]
)
Defining Client Name
Each client has a name associated with it. By default, it is set to
hz.client_${CLIENT_ID}. Here CLIENT_ID starts from 0 and it
is incremented by 1 for each new client. This id is incremented and
set by the client, so it may not be unique between different clients
used by different applications.
You can set the client name using the client_name configuration
element.
client = hazelcast.HazelcastClient(
    client_name="blue_client_0"
)
Configuring Load Balancer
Load Balancer configuration allows you to specify which cluster member to send next operation when queried.
If it is a Smart Client,
only the operations that are not key-based are routed to the member
that is returned by the LoadBalancer. If it is not a smart client,
LoadBalancer is ignored.
By default, client uses round robin load balancer which picks each
cluster member in turn. Also, the client provides random load balancer
which picks the next member randomly as the name suggests. You can use
one of them by setting the load_balancer config option.
The following are example configurations.
from hazelcast.util import RandomLB

client = hazelcast.HazelcastClient(
    load_balancer=RandomLB()
)
You can also provide a custom load balancer implementation to use
different load balancing policies. To do so, you should provide a class
that implements the LoadBalancers interface or extend the
AbstractLoadBalancer class for that purpose and provide the load
balancer object into the load_balancer config option.